
With all the stuff that you film-makers and film-enthusiasts can do, from my personal experience – I know that lighting for video or photography can be a real pain. This blog aim’s to be a basic tutorial of one of the most commonly used lighting techniques in film and photography.
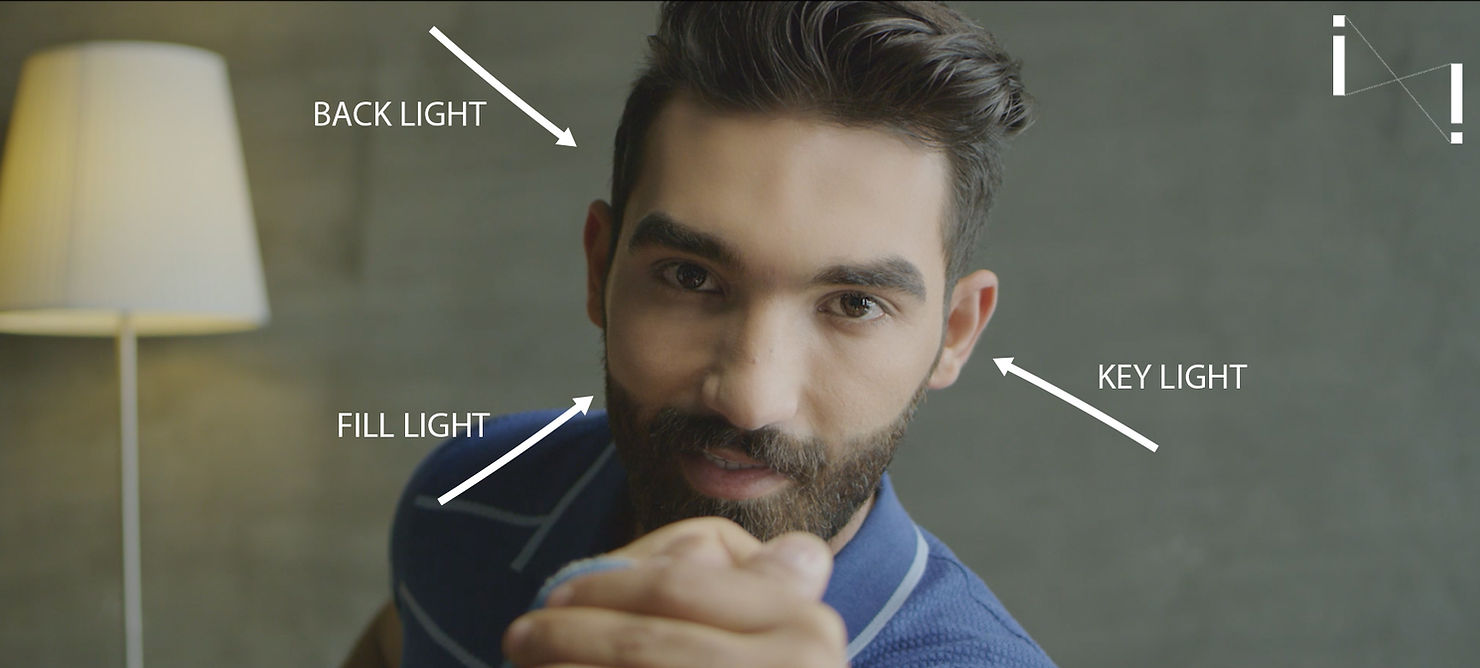
Three-point illumination is a typical way of highlighting a target from 3 distinct locations in a scene with light sources. Core illumination, fill light, and backlight are the three styles of lighting.
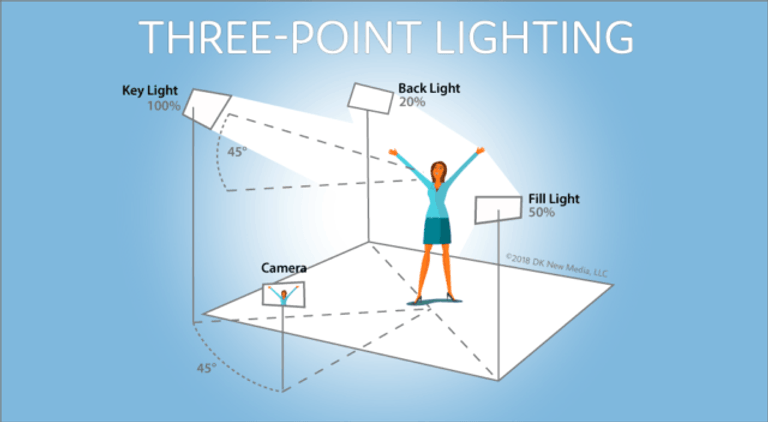
The Key Light is the primary and best source of light for the three-point lighting system. It offers an overall description of a scene. Cinematographers usually place this leading light slightly off to the viewer’s side and the subject’s head, on a light stand at a 45-degree angle to the viewer, which creates shadows on the opposite side of the subject’s profile, giving it perspective and width. The key light forms a scene’s mood. It may create a high-key image (evenly, softly lit and atmospherically upbeat) or a low-key image (high contrasts, deep shadows, and very moody), depending on its position and the supplementary lights used in the overall lighting.
The Fill Light is mirroring the key light on the camera’s opposite side; this light practically fills the shadows produced by key light on a subject, bringing out information in the darkness. This secondary light is usually less bright than the primary, and cinematographers monitor the general look of their shots depending on how often the fill light is dimmed or lightened. A dim fill light, where the fill proportion is high, produces a high-contrast, film-noir shadow style while a brighter light with a lower, more even ratio provides a more even look to the subject. The second light is not necessarily a lamp: it can be a reflector, a bounce card, a mirror, or something that fills the darkness with any light back on the subject. The fill light, in combination with the leading light source, decides the atmosphere of a scene.
In this lighting method, the third source, Backlight (also known as the “rim light” or “hair light”), shines from behind on a subject, completing the light system. Creating a rim of light, or outline that pushes the subject away from the background. It gives a sense of depth around their head. Cinematographers typically position the backlight directly behind the subject, or high enough to be out of the frame, opposite the key light and pointing to the back of the subject ‘s neck.
What are the uses of a Three Point Light?
There is no fixed rule for how to use the three-point lighting technique. This also depends on the location, the subject matter and the atmosphere a cinematographer or photographer needs to create in general.
Effective lighting produces a more exciting and fluid shot where the subject is seen with more depth and where the shadows are more regulated by the cinematographer.
The lighting design tends to give the depth of the characters. Three-point lighting also helps mould a subject to bring out the best or worst of them.
A cinematographer creates a soft, flattering look by placing a soft key light slightly off centre with a 2:1 fill ratio, which also tends to conceal blemishes in the skin when your subjects are people. This dim lighting is called “high key lighting” which produces a positive, cheerful, happy, warm, which airy atmosphere that is typical in comedies and sitcoms.

If a filmmaker opts for a higher fill ratio, such as 8:1, the leading light casts sharp-edged shadows which contrast sharply with the sun. It is “low key illumination,” which produces a dark, enigmatic, disturbing, and alienating atmosphere and can show a variety of intense negative emotions. As such, the dark dramas, thrillers, horror, and film noir are popular.
How to set up ‘Three Point Lighting’?
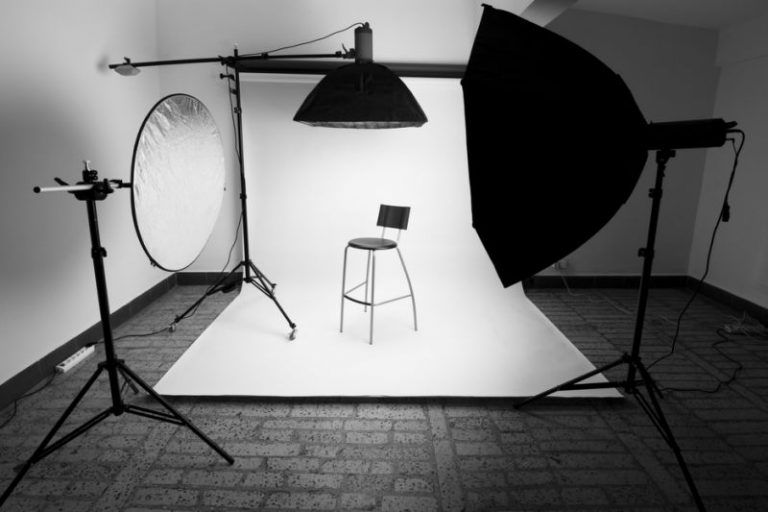
There are several main components to effectively set up three-point lighting and produce a secure, polished video.
1. Establish what motivates your light.
Once you start configuring your lighting kit, you need to know exactly what look you want to achieve and why. There are no spontaneous lighting configurations. The scene’s light source has to make sense; in terms of the setting in which the characters live. Is it the rainy sky? Downtown? The allure of darkness? When the inspiration has been developed, you may continue to position your light kit and change it to achieve that result. (You may want “unmotivated” light, too. Having unnatural light, in horror, gives the impression that something is gone and disturbs the spectator.
2. Take in consideration your light source and distance.
The size of a light source relative to the size of the subject determines whether the shadows should be “hard” (harp, distinctive edges) or “soft” (smooth, feathered edges). A smaller source of light produces sharper, precise edges while a larger one softens the shadows. When you want a softer look in studio lighting, you put enlarging modifiers like an umbrella, softbox, or another diffusion between the light source and the subject. Because of this relative size situation the distance between the light source and the target also influences the softness of the shadow. If you put the source closer to the issue, it will make the shadows darker. If you pull back the light from them, the shadows will become harder, making the relative size to the subject smaller.
3. Pay attention to the intensity of your light source.
“Brightness” means the measure of the intensity of a light source. With a light metre, you measure it in lumens. For LED lights, fluorescent lights and incandescent lights, you monitor the strength of the performance, which affects your scene ‘s look. Brighter light will make the corners and darkness sharper.
4. Position your light source considerately.
Where you place your lights relative to your subject, and where shadows fall, and the camera position. This again relates to creating an environment sensibly — if your key light represents the sun, it should accurately reflect that source’s angle and height. If there are dark, moody shadows or an positive, even light thrown over your picture, the way you place your fill and backlight effect the final picture.
5. Test your setup beforehand.
After deciding the purpose of the lights, their scale, reach, strength and location, set it up so you can see precisely how all the lights work together and how their result is precisely what you expected it to be. If it is not, then make changes until it is okay.
Act with the advantages and drawbacks of each venue. Do a setup involving window lighting, and then do one in a windowless space. Try three point lighting on objects as well as people. How does the light differ when used on something smooth, like a basketball, or made up of complex lines, like a bicycle?
For a straightforward description of a traditional three-point lighting technique, this is it. You will find yourself regularly using the ‘three-point lighting’ method to take successful video or photos. It’s an essential part of any videographer’s visual vocabulary. I hope that this blog has enough information for you to be able to understand the basics of the technique and practise it, because at Cinemagic, we aim to empower the youth.